MF0028 Installation Notes
MF0028
Fuel Gauge Mapper
This device will allow any fuel sender and gauge, within the range of 0-500 Ohms to the mapped together without modifications to the sender or gauge. Can be fully calibrated to the individuals needs.
Mad Folk offers multiple ways to wire in this device. If you choose the Mad Folk Custom Case option, the pin out is as followed.

1 - Power - DC 9~36v
2 - Ground
3 - Input 0-500 Ohms
4 - Output 0-500 Ohms
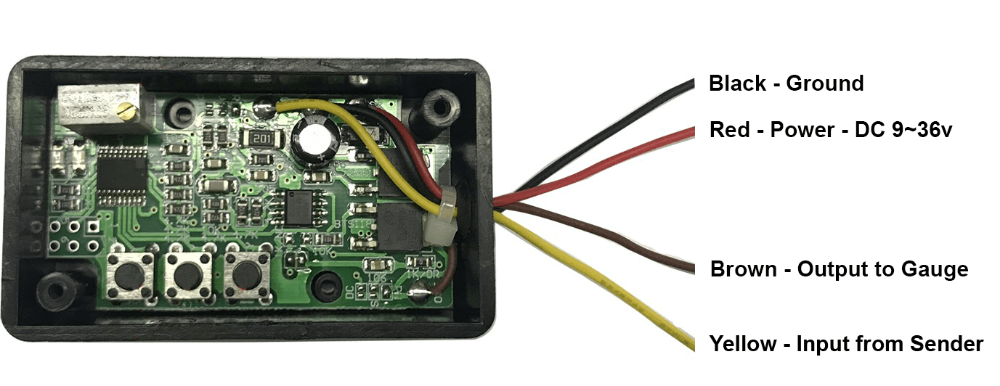
If you have chosen to stick with the stock case with wire tails, the wires are as followed.

Calibration
NOTE: If using the stock standard case, it will need to be opened using the two screws so that it can be programed. The Mad Folk case will not need to be opened as the buttons can be accessed through the holes in the case
The calibration process of this device works by programming or mapping 3 positions of the fuel sender to the guage. Full, Half and Empty. For each of the three positions, the trimming pot is adjusted so that the actaul fuel gauge reads as per the position of the sender.
To enter calibration mode:
ensure the device is powered off for at east 5 seconds
Press and hold the "F" button while turning on the ignition
Once powered on, release the "F" button
The red light should come on and stay solid. This indicates calibration mode.
Move the fuel sender float to the FULL position.
using a small screwdriver, turn the trimming pot untill the fuel gauge reads correctly (full)
then press the "F" button to store this state.
Move the fuel sender float to the HALF WAY position.
using a small screwdriver, turn the trimming pot untill the fuel gauge reads correctly (Half)
then press the "M" button to store this state.
Move the fuel sender float to the EMPTY position.
using a small screwdriver, turn the trimming pot untill the fuel gauge reads correctly (Empty)
then press the "E" button to store this state.
Switch Ignition off for approximatly 5 seconds.
FINISHED
Power back on and test by moving the fuel sender from empty to full, the gauge should follow accordingly.
